本文介绍Nginx服务器配置负载均衡详解,希望对于初学Nginx服务器相关的朋友有帮助,更多Nginx安装、配置、报错处理等资源请本站内搜索。。
安装完成之后 安装 nginx
./configure --with-http_stub_status_module –prefix=/usr/local/nginx
make
make install
就这样nginx 安装完成 启动nginx 命令如下 ./nginx & 如果通过http://localhost 能够访问的话 表示安装成功 /如图:

安装成功后 /usr/local/nginx 目录下有四个子目录分别是:conf、html、logs、sbin 。其中 Nginx 的配置文件存放于 conf/nginx.conf,Nginx 只有一个程序文件位于 sbin 目录下的 nginx 文件。
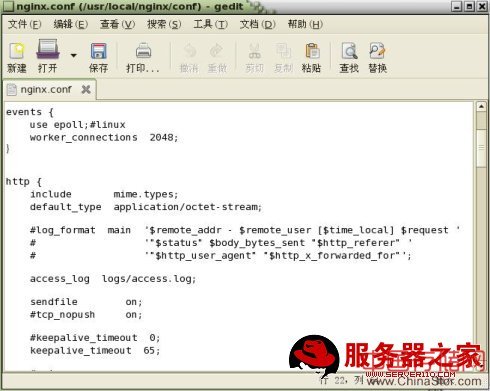
打开nginx.conf配置文件 修改后内容如下: #user nobody;
worker_processes 1;
#error_log logs/error.log;
#error_log logs/error.log notice;
#error_log logs/error.log info;
#pid logs/nginx.pid;
events {
use epoll;#linux
worker_connections 2048;
}
http {
include mime.types;
default_type application/octet-stream;
#log_format main '$remote_addr - $remote_user [$time_local] $request '
# '"$status" $body_bytes_sent "$http_referer" '
# '"$http_user_agent" "$http_x_forwarded_for"';
access_log logs/access.log;
sendfile on;
#tcp_nopush on;
#keepalive_timeout 0;
keepalive_timeout 65;
#gzip on;
upstream mao{
server 192.168.0.208:8080 weight=2;
server 192.168.0.235 weight=3;
}
server {
listen 80;
server_name www.today.com;
charset utf-8;
#access_log logs/host.access.log main;
location ~* ^.+.(jpg|jpeg|gif|png|ico|css|zip|tgz|gz|rar|bz2|doc|xls|exe|pdf|ppt|txt|tar|mid|midi|wav|bmp|rtf|js|mov) {
access_log off; # po co mi logi obrazków :)
expires 30d;
}
location ~ ^/(WEB-INF)/ {
deny all;
}
location /NginxStatus/ {
stub_status on; #Nginx 状态监控配置
access_log off;
}
location /they{
proxy_pass http://mao;# 反向代理
#include proxy.conf;
}
# location / {
#proxy_pass http://192.168.0.208:8080;
#proxy_set_header X-Real-IP $remote_addr;
#}
#error_page 404 /404.html;
# redirect server error pages to the static page /50x.html
#
error_page 500 502 503 504 /50x.html;
location = /50x.html {
root html;
}
# proxy the PHP scripts to Apache listening on 127.0.0.1:80
#
#location ~ .php$ {
# proxy_pass http://127.0.0.1;
#}
# pass the PHP scripts to FastCGI server listening on 127.0.0.1:9000
#
#location ~ .php$ {
# root html;
# fastcgi_pass 127.0.0.1:9000;
# fastcgi_index index.php;
# fastcgi_param SCRIPT_FILENAME /scripts$fastcgi_script_name;
# include fastcgi_params;
#}
# deny access to .htaccess files, if Apache's document root
# concurs with nginx's one
#
#location ~ /.ht {
# deny all;
#}
}
# another virtual host using mix of IP-, name-, and port-based configuration
#
#server {
# listen 8000;
# listen somename:8080;
# server_name somename alias another.alias;
# location / {
# root html;
# index index.html index.htm;
# }
#}
# HTTPS server
#
#server {
# listen 443;
# server_name localhost;
# ssl on;
# ssl_certificate cert.pem;
# ssl_certificate_key cert.key;
# ssl_session_timeout 5m;
# ssl_protocols SSLv2 SSLv3 TLSv1;
# ssl_ciphers ALL:!ADH:!EXPORT56:RC4+RSA:+HIGH:+MEDIUM:+LOW:+SSLv2:+EXP;
# ssl_prefer_server_ciphers on;
# location / {
# root html;
# index index.html index.htm;
# }
#}
}

动态页面请求处理:
Nginx 本身并不支持现在流行的 JSP、ASP、PHP、PERL 等动态页面,但是它可以通过反向代理将请求发送到后端的服务器,例如 Tomcat、Apache、IIS 等来完成动态页面的请求处理。前面的配置示例中,我们首先定义了由 Nginx 直接处理的一些静态文件请求后,其他所有的请求通过 proxy_pass 指令传送给后端的服务器(在上述例子中是 Tomcat)。最简单的 proxy_pass 用法如下:
location / {
proxy_pass http://localhost:8080;
proxy_set_header X-Real-IP $remote_addr;
}
在本例中我们配置的是2台机器的负载均衡 所以我们的配置是 :
location /they{
proxy_pass http://mao;# 反向代理
#include proxy.conf;
}
其中 mao 是我们用upstream 来定义的 例如:
upstream mao{
server 192.168.0.208:8080 weight=2;
server 192.168.0.235 weight=3;
}
在 Nginx 的集群配置中,Nginx 使用最简单的平均分配规则给集群中的每个节点分配请求。一旦某个节点失效时,或者重新起效时,Nginx 都会非常及时的处理状态的变化,以保证不会影响到用户的访问。
声明: 此文观点不代表本站立场;转载须要保留原文链接;版权疑问请联系我们。


