本文介绍FastDFS、Nginx配置过程笔记,希望对于初学Nginx服务器相关的朋友有帮助,更多Nginx安装、配置、报错处理等资源请本站内搜索。。
第一部分 FastDFS介紹
1.FastDFS是什麼
FastDFS是一款類Google FS的開源分布式文件系統,它用純C語言實現,支持Linux、FreeBSD、AIX等UNIX系統。它只能通過專有API對文件進行存取訪問,不支持POSIX接口方式,不能mount使用。
准確地講,Google FS以及FastDFS、mogileFS、 HDFS、TFS等類Google FS都不是系統級的分布式文件系統,而是應用級的分布式文件存儲服務。
FastDFS的作者是餘慶,現在淘寶網Java中間件團隊從事Java基礎平台研發工作。
以上文字引用自<<程序員>> 文章 <<分布式文件系統FastDFS架構剖析>> http://www.programmer.com.cn/tag/fastdfs-架構/
2.FastDFS的體系結構
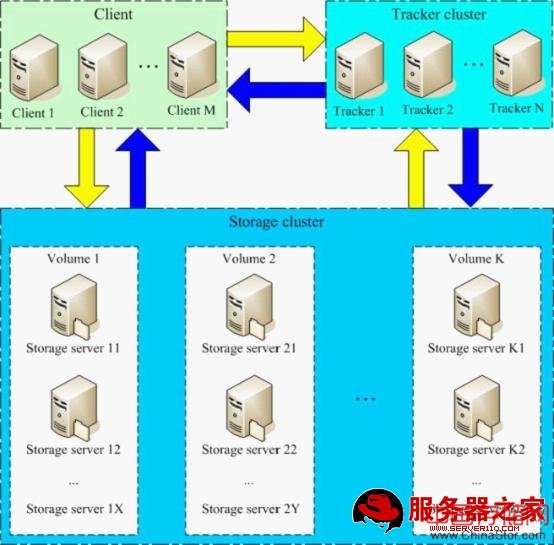
3.FastDFS工作過程
1. Client詢問Tracker server上傳到的Storage server;
2. Tracker server返回一台可用的Storage server,返回的數據为該Storage server的IP地址和端口;
3. Client直接和該Storage server建立連接,進行文件上傳,Storage server返回新生成的文件ID,文件上傳結束。
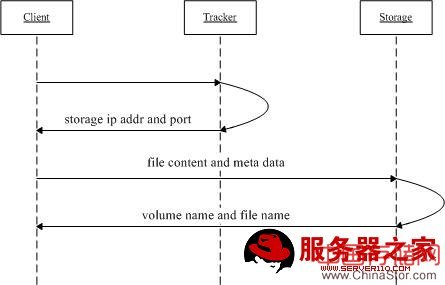
1. Client詢問Tracker server可以下載指定文件的Storage server,参數为文件ID(包含組名和文件名);
2. Tracker server返回一台可用的Storage server;
3. Client直接和該Storage server建立連接,完成文件下載。
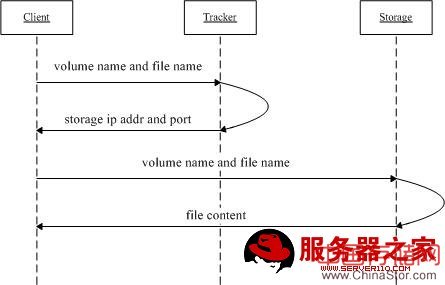
FastDFS從V1.20開始,支持通過HTTP協議下載文件。
1.用戶瀏覽器訪問Tracker server內置的Web Server,URL中包含文件ID(包含組名和文件名);
2.Tracker server將這個HTTP請求redirect到一台可用的Storage server的Web Server上(可以是apache或nginx);
3.用戶瀏覽器直接與Storage server的Web Serverr建立連接,完成文件下載。
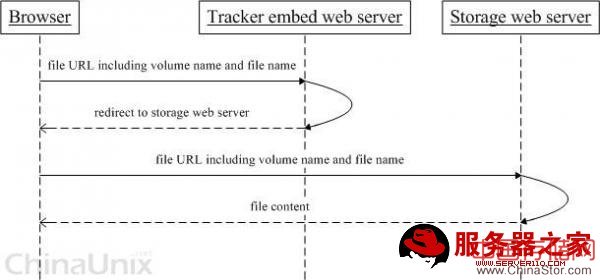
第二部分 FastDFS+nginx_module配置手記
1.系統環境
最小化安裝的 CentOS 5.6 x86_64
tracker server: 192.168.3.220
storage server: 192.168.3.226
2.環境准備[所有服務器上操作]
为了速度,配置使用sohu的源
cd /etc/yum.repo.d/
wget http://go.rritw.com/mirrors.sohu.com/help/CentOS-Base-sohu.repo
安裝EPEL源
rpm -ihv http://go.rritw.com/download.fedora.redhat.com/pub/epel/5/x86_64/epel-release-5-4.noarch.rpm
安裝開發工具和編譯nginx所需的開發包
yum groupinstall "Development Tools"
yum install libevent-devel.x86_64 pcre-devel.x86_64 zlib-devel.x86_64
3.在tracker上的操作[安裝tracker server]
[[email protected]]# wget http://go.rritw.com/fastdfs.googlecode.com/files/FastDFS_v3.05.tar.gz
[[email protected]]# tar xvzf FastDFS_v3.05.tar.gz
[[email protected]]# cd FastDFS
[[email protected]]# vi make.sh
將如下兩行前邊的"#"刪除
WITH_HTTPD=1
WITH_LINUX_SERVICE=1
[[email protected]]# ./make.sh
[[email protected]]# ./make.sh install
[[email protected]]# vi /etc/fdfs/tracker.conf
修改/etc/fdfs/tracker.conf,主要修改以下兩處,如有其他調整,可参考文檔自行調整,默認的配置也可以工作。
# the base path to store data and log files
base_path=/home/tracker ====> 放置data和log的目錄
##include http.conf ====> #include http.conf 這裏一定要注意!是 #include,不是include!!!
[[email protected]]# mkdir -p /home/tracker
启動tracker服務
[[email protected]]# /etc/init.d/fdfs_trackerd start
確認8080,22122端口已經監聽
[[email protected]]# netstat -nl|grep -E '8080|22122'
tcp 0 0 0.0.0.0:22122 0.0.0.0:* LISTEN
tcp 0 0 0.0.0.0:8080 0.0.0.0:* LISTEN
4.在storage上的操作
[[email protected]]# wget http://go.rritw.com/fastdfs.googlecode.com/files/FastDFS_v3.05.tar.gz
[[email protected]]# wget http://go.rritw.com/fastdfs.googlecode.com/files/fastdfs-nginx-module_v1.10.tar.gz
[[email protected]]# wget http://go.rritw.com/nginx.org/download/nginx-1.0.11.tar.gz
[[email protected]]# tar xvzf FastDFS_v3.05.tar.gz
[[email protected]]# cd FastDFS
[[email protected]]# ./make.sh
[[email protected]]# ./make.sh install
[[email protected]]# tar xvzf nginx-1.0.11.tar.gz
[[email protected]]# tar xvzf fastdfs-nginx-module_v1.10.tar.gz
[[email protected]]# cd nginx-1.0.11
[[email protected]]# ./configure --prefix=/usr/local/nginx --add-module=/root/fastdfs-nginx-module/src
[[email protected]]# make
[[email protected]]# make install
[[email protected]]# vi /etc/fdfs/storage.conf
修改/etc/fdfs/storage.conf,主要修改以下幾處,如有其他調整,可参考文檔自行調整,默認的配置也可以工作。
# the name of the group this storage server belongs to
group_name=group1 ====> 此台storage server所屬的服務器組名
# the base path to store data and log files
base_path=/home/storage ====> 放置data和log的目錄
# store_path#, based 0, if store_path0 not exists, it's value is base_path
# the paths must be exist
store_path0=/home/storage ====> 放置文件的目錄
# tracker_server can ocur more than once, and tracker_server format is
# "host:port", host can be hostname or ip address
tracker_server=192.168.3.220:22122 ====> tracker server的ip和端口,此處可以寫多個tracker server,每行一個
#HTTP settings
http.disabled=true ====> 關閉內置的web server
# the port of the web server on this storage server
http.server_port=80 ====> web server的端口改成80
[[email protected]]# cp /root/fastdfs-nginx-module/mod_fastdfs.conf /etc/fdfs/
[[email protected]]# vi /etc/fdfs/mod_fastdfs.conf
# the base path to store log files
base_path=/home/storage ====> 放置log的目錄
# FastDFS tracker_server can ocur more than once, and tracker_server format is
# "host:port", host can be hostname or ip address
tracker_server=192.168.3.220:22122 ====> tracker server的ip和端口,此處可以寫多個tracker server,每行一個
# the group name of storage server
group_name=group1 ====> 此台storage server所屬的服務器組名
# if uri including group name
# default value is false
url_have_group_name = true ====> 在URL中包含group名稱
# store_path#, based 0, if store_path0 not exists, it's value is base_path
# the paths must be exist
store_path0=/home/storage ====> 放置文件的目錄
[[email protected]]# mkdir -p /home/storage
在nginx的server配置段中增加M00的location聲明
[[email protected]]# vi /usr/local/nginx/conf/nginx.conf
location /group1/M00 {
root /home/storage/data;
ngx_fastdfs_module;
}
創建M00目錄的軟連接
[[email protected]]# ln -s /home/storage/data /home/storage/data/M00
启動storage服務
[[email protected]]# /etc/init.d/fdfs_storaged start
启動nginx
[[email protected]]# /usr/local/nginx/sbin/nginx
確認8080,22122端口已經監聽
[[email protected]]# netstat -nl|grep -E '80|23000'
tcp 0 0 0.0.0.0:23000 0.0.0.0:* LISTEN
tcp 0 0 0.0.0.0:80 0.0.0.0:* LISTEN
5.在tracker上的操作[作为client測試]
修改/etc/fdfs/client.conf文件,主要修改以下幾處,如有其他調整,可参考文檔自行調整,默認的配置也可以工作。
# the base path to store log files
base_path=/tmp
# tracker_server can ocur more than once, and tracker_server format is
# "host:port", host can be hostname or ip address
tracker_server=192.168.3.220:22122
創建一個用於測試的文件demofile.txt
[[email protected]]# vi demofile.txt
內容就一行字: dddddddddd
使用自帶的fdfs_test上傳文件測試。
[[email protected]]# /usr/local/bin/fdfs_test /etc/fdfs/client.conf upload demofile.txt
This is FastDFS client test program v3.05
Copyright (C) 2008, Happy Fish / YuQing
FastDFS may be copied only under the terms of the GNU General
Public License V3, which may be found in the FastDFS source kit.
Please visit the FastDFS Home Page http://go.rritw.com/www.csource.org/
for more detail.
[2012-01-20 14:36:04] INFO - base_path=/tmp, connect_timeout=30, network_timeout=60, tracker_server_count=1, anti_steal_token=0, anti_steal_secret_key length=0
tracker_query_storage_store_list_without_group:
server 1. group_name=group1, ip_addr=192.168.3.226, port=23000
group_name=group1, ip_addr=192.168.3.226, port=23000
storage_upload_by_filename
group_name=group1, remote_filename=M00/00/00/wKgD4k8ZC1SNK-NYAAAAC3lx3Rk484.txt
source ip address: 192.168.3.226
file timestamp=2012-01-20 14:36:04
file size=11
file crc32=2037505305
file url: http://go.rritw.com/192.168.3.220:8080/group1/M00/00/00/wKgD4k8ZC1SNK-NYAAAAC3lx3Rk484.txt
storage_upload_slave_by_filename
group_name=group1, remote_filename=M00/00/00/wKgD4k8ZC1SNK-NYAAAAC3lx3Rk484_big.txt
source ip address: 192.168.3.226
file timestamp=2012-01-20 14:36:04
file size=11
file crc32=2037505305
file url: http://go.rritw.com/192.168.3.220:8080/group1/M00/00/00/wKgD4k8ZC1SNK-NYAAAAC3lx3Rk484_big.txt
6.使用瀏覽器打開上傳的文件
我們在瀏覽器中輸入http://go.rritw.com/192.168.3.220:8080/group1/M00/00/00/wKgD4k8ZC1SNK-NYAAAAC3lx3Rk484.txt

可以看到,訪問的地址已經被redirect到了storage server的IP(192.168.3.226)了。
声明: 此文观点不代表本站立场;转载须要保留原文链接;版权疑问请联系我们。


