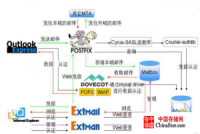
系统环境:rhel6 x86_64 selinux and iptables disabled 1.使用extmail自带模板在mysql中创建数据库 yum install mysql mysql-server mailx -y /etc/init.d/my

1.使用extmail自带模板在mysql中创建数据库
yum install mysql mysql-server mailx -y
/etc/init.d/mysqld start
mkdir /var/www/extsuite; cd /var/www/extsuite/
tar zxf extmail-1.2.tar.gz
tar zxf extman-1.1.tar.gz
mv extmail-1.2 extmail
mv extman-1.1 extman
cd extman/docs/
vi init.sql 修改root@extmail.org的密码
mysql < extmail.sql 导入extmail自带数据库
mysql < init.sql 导入extmail的测试账户
2.配置postfix支持虚拟域
cd /var/www/extsuite/extman/docs/
拷贝模板文件:
cp mysql_virtual_alias_maps.cf
mysql_virtual_domains_maps.cf mysql_virtual_mailbox_maps.cf
/etc/postfix/
useradd -u 600 vmail
postconf -e inet_interfaces=all
postconf -e virtual_mailbox_base=/home/vmail
postconf -e virtual_uid_maps=static:600
postconf -e virtual_gid_maps=static:600
postfix读取模板文件:
postconf -e
virtual_alias_maps=mysql:/etc/postfix/mysql_virtual_alias_maps.cf
postconf -e
virtual_mailbox_domains=mysql:/etc/postfix/mysql_virtual_domains_maps.cf
postconf -e
virtual_mailbox_maps=mysql:/etc/postfix/mysql_virtual_mailbox_maps.cf
重启postfix,查看是否成功!
/etc/init.d/postfix restart
echo "hello world" | mail -s test
support@exmail.org
[root@desktop19 dovecot]# cd
/home/vmail/
[root@desktop19 vmail]# ls
extmail.org
目录存在则postfix配置成功
3.配置MDA(dovecot)
yum install dovecot dovecot-mysql -y
cd /etc/dovecot/conf.d/
vi 10-mail.conf
mail_location = maildir:/home/vmail/%d/%n/Maildir
邮件收取配置,这里采用mairdir形式
first_valid_uid = 600
vim 10-auth.conf
!include
auth-sql.conf.ext 去掉注释
cd ../
vi dovecot-sql.conf.ext
driver
=mysql
connect
= host=localhost dbname=extmail user=extmail
password=extmail
default_pass_scheme = MD5
password_query =
SELECT username, domain, password
FROM mailbox WHERE username = '%u' and domain = '%d'
user_query =
SELECT maildir, 600 AS uid, 600 AS gid FROM mailbox WHERE username
= '%u'
启动dovecot,测试
/etc/init.d/dovecot start
***************************************************
[root@desktop19 Maildir]# telnet localhost 110
Trying ::1...
Connected to localhost.
Escape character is '^]'.
+OK Dovecot ready.
<1832.1.513560b4.LftMXp8dtjujF/reBTodLw==@desktop19.example.com>
user postmaster@extmail.org
+OK
pass extmail
+OK Logged in.
list
+OK 2 messages:
1 568
2 568
***************************************************
4.配置web界面:
vi /etc/httpd/conf/httpd.conf
*************************************************************
<VirtualHost *:80>
ServerName www.example.com
DocumentRoot /var/www/html
</VirtualHost>
<VirtualHost *:80>
ServerName mail.extmail.org
DocumentRoot
/var/www/extsuite/extmail/html/
ScriptAlias /extmail/cgi
/var/www/extsuite/extmail/cgi
Alias /extmail
/var/www/extsuite/extmail/html
ScriptAlias /extman/cgi
/var/www/extsuite/extman/cgi
Alias /extman
/var/www/extsuite/extman/html
SuexecUserGroup vmail vmail
</VirtualHost>
*************************************************************
cd /var/www/extsuite/extmail
chown vmail.vmail cgi/ -R
cp webmail.cf.default webmail.cf
vi webmail.cf
SYS_MAILDIR_BASE = /home/vmail
SYS_MYSQL_USER = extmail
SYS_MYSQL_PASS = extmail
SYS_CRYPT_TYPE = plain
cd /var/www/extsuite/extman
chown vmail.vmail cgi/ -R
cp webman.cf.default webman.cf
vi webman.cf
SYS_MAILDIR_BASE = /home/vmail
SYS_SESS_DIR = /tmp/
SYS_CAPTCHA_LEN = 4
SYS_CRYPT_TYPE = plain
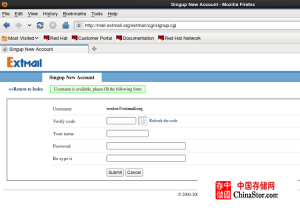
启动httpd,测试界面:
如图2,
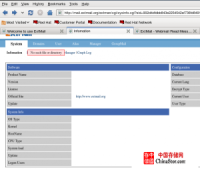
 则安装CGI:
yum install *CGI -y
如图3

则安装perl-ExtUtils-MakeMaker,gcc
tar zxf Unix-Syslog-1.1.tar.gz
cd Unix-Syslog-1.1
perl Makefile.PL
make test
make install
在新用户注册时,出现验证码显示不正常则:
如图4,
 安装:
安装:yum install -y perl-GD
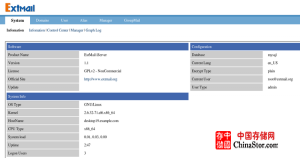
如图5

支持监控:
yum install rrdtool-perl -y
tar zxf File-Tail-0.99.3.tar.gz
cd File-Tail-0.99.3
perl Makefile.PL
make
make install
cp -r /var/www/extsuite/extman/addon/mailgraph_ext/ /usr/local/
/var/www/extsuite/extman/daemon/cmdserver -d
/usr/local/mailgraph_ext/mailgraph-init restart

5.反病毒配置:
yum install -y spamassassin -y
/etc/init.d/spamassassin start
下载病毒库管理软件:
clamav-0.97.6-1.el6.rf.x86_64.rpm
clamav-milter-0.97.6-1.el6.rf.x86_64.rpm
clamav-db-0.97.6-1.el6.rf.x86_64.rpm
clamd-0.97.6-1.el6.rf.x86_64.rpm
更新病毒库:
[root@desktop19 mnt]# freshclam
ClamAV update process started at Tue Mar 5 15:35:12 2013
main.cvd is up to date (version: 54, sigs: 1044387, f-level: 60,
builder: sven)
daily.cvd is up to date (version: 16784, sigs: 871048, f-level: 63,
builder: neo)
bytecode.cvd is up to date (version: 214, sigs: 41, f-level: 63,
builder: neo)
tar zxf MailScanner-4.84.5-3.rpm.tar.gz
cd MailScanner-4.84.5-3
./install.sh
配置MailScanner和postfix
vi /etc/MailScanner/MailScanner.conf
Run As User =
postfix
Run As Group =
postfix
Incoming Queue Dir
= /var/spool/postfix/hold
Outgoing Queue Dir
= /var/spool/postfix/incoming
MTA = postfix
Virus Scanners =
clamav
Always Include
Spamassassin report = yes
Use Spamassassin =
yes
SpamAssassin User
State Dir = /var/spool/MailScanner/spamassassin
mkdir
/var/spool/MailScanner/spamassassin
chown -R postfix.postfix
/var/spool/MailScanner/*
postconf -e
header_checks=regexp:/etc/postfix/header_checks
echo /^Received:/ HOLD >>
/etc/postfix/header_checks
测试:
信件携带病毒时,查看日志:tail -f /var/log/maillog

若信件正常,则显示已信任

POSTFIX升级:
postfix更新:
1.版本
yum install make gcc db4-devel -y
tar zxf postfix-2.10.0.tar.gz
cd postfix-2.10.0
make -f Makefile.init makefiles
make upgrade
2.数据库支持
make -f Makefile.init makefiles 'CCARGS=-DHAS_MYSQL
-I/usr/include/mysql' 'AUXLIBS=-L/usr/lib64/mysql
-lmysqlclient -lz -lm'
make upgrade
3.加密支持
make -f Makefile.init makefiles 'CCARGS=-DHAS_MYSQL
-I/usr/include/mysql -DUSE_SASL_AUTH -DUSE_CYRUS_SASL
-I/usr/include/sasl' 'AUXLIBS=-L/usr/lib64/mysql
-lmysqlclient -lz -lm -R/usr/lib64 -lsasl2'
make upgrade
声明: 此文观点不代表本站立场;转载须要保留原文链接;版权疑问请联系我们。


