目前邮件服务器中,想要拥有自己的邮件服务器,单单使用senmail,postfix已经不能满足用户的需求了,越来越多的企业使用extmail在搭建企业级的邮件服务器。而我们使用的邮件服务器需要满足什么条件呢?1.支持页面注册,发信 授信。 //满足用户的基本需
目前邮件服务器中,想要拥有自己的邮件服务器,单单使用senmail,postfix已经不能满足用户的需求了,越来越多的企业使用extmail在搭建企业级的邮件服务器。
而我们使用的邮件服务器需要满足什么条件呢?
1.支持页面注册,发信 授信。 //满足用户的基本需求
2.支持自由注册。 //使用方便
3.支持网盘。 //节约资源
4.采用虚拟账号。 //安全性高
其架构图:

在此架构中:
1. postfix 实现邮件发送服务器的角色。
2. dovecot 作为邮件接收服务器的角色。
3. extmail 实现利用web界面收发信件。
4. extman 用户注册同个extman的页面
5. mysql数据库,存放用户的账户信息
6. cyrus-sasl courier-authlib 实现用户的身份验证
配置过程:
1.安装extmail所需要准备工作
1.1 安装所需要的基础服务的rpm包
yum install httpd mysql mysql-server mysql-devel openssl-devel dovecot perl-DBD-MySQL tcl tcl-devel libart_lgpl libart_lgpl-devel libtool-ltdl libtool-ltdl-devel expect
1.2 关闭sendmail,并将它的随系统自动启动功能关闭:
# service sendmail stop
# chkconfig sendmail off

1.3 安装以下开发所用到的rpm包组:
Development Libraries
Development Tools
Legacy Software Development
X Software Development
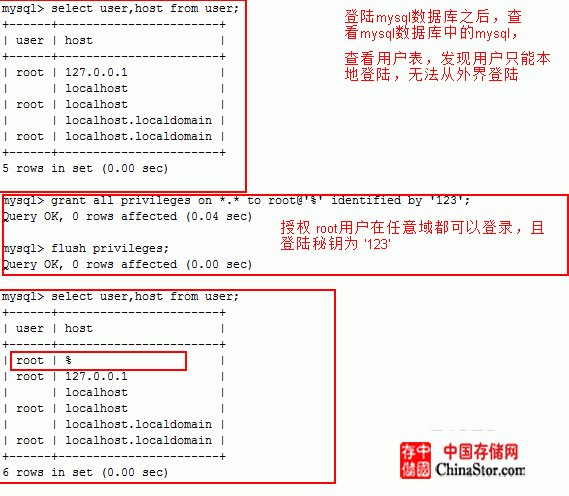
1.4 启动mysql数据库,并给mysql的root用户设置密码:
# service mysqld start
# chkconfig mysqld on
# mysqladmin -u root password '123'
也可以
---------------------------------授权本地用户
SET PASSWORD FOR root@'localhost'=PASSWORD('redhat');
SET PASSWORD FOR root@'127.0.0.1'=PASSWORD('redhat');
FLUSH PRIVILEGES;
-------------------------------授权远程用户
GRANT ALL PRIVILEGES ON *.* TO root@'%' IDENTIFIED BY 'redhat';
FLUSH PRIVILEGES;
1.5 启动saslauthd服务,并将其加入到自动启动队列:
# service saslauthd start
# chkconfig saslauthd on

1.6 启动httpd服务,并将其加入到自动启动队列

2.配置本机的DNS服务器
2.1安装dns服务器相关的软件包
yuminstall bind-chroot caching-nameserver
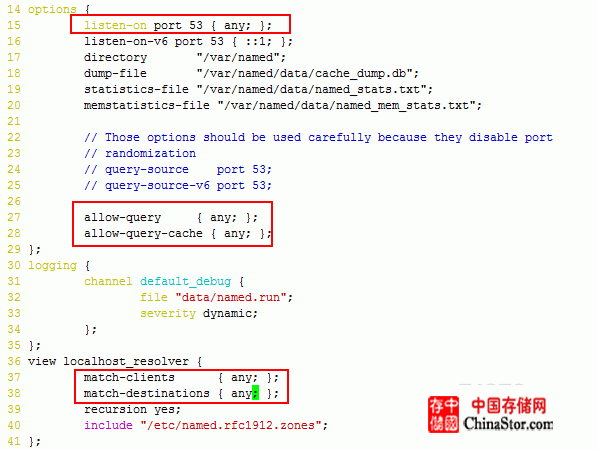
2.2编辑主配置文件
cd /var/named/chroot/etc/
cp -p named.caching-nameserver.confnamed.conf
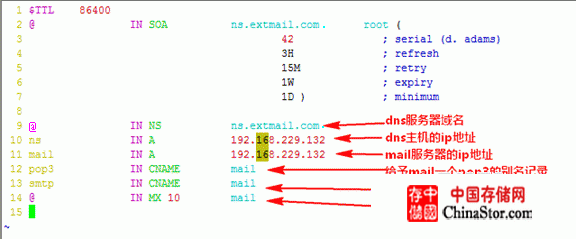
2.3 声明DNS区域

/var/named/chroot/var/named
cp -p localhost.zone extmail.com.zone
vim extmail.com.zone
2.4 编辑系统服务器hostname

2.5 编辑DNS指向

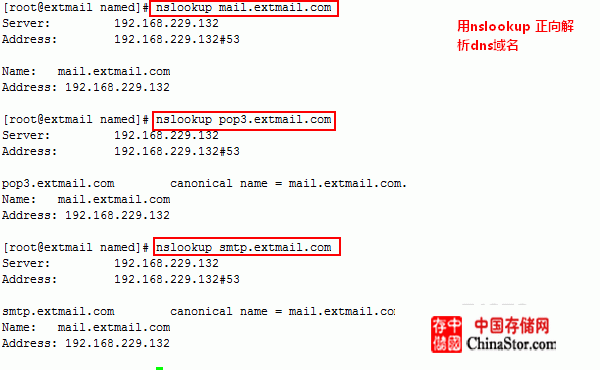
2.6 启动服务,测试解析结果
[root@extmailnamed]# service named start
Startingnamed: [ OK ]
3.安装postfix服务 【源代码】
数据包以及版本:
Unix-Syslog-0.100.tar.gz syslog机制负责发送、记录系统内核及工具所产生的信息。
courier-authlib-0.63.0.tar.bz2 把Mail与验证(courier-authlib)结合在一起实现mysql数据库验证
extmail-1.2.tar.gz 提供web页面的邮件收发功能。
extman-1.1.tar.gz 提供用户注册。
postfix-2.8.2.tar.gz postfix mail的主程序。
3.1 Postfix
3.1.1 创建postfix的相关账号和用户组
#groupadd -g 2525 postfix
#useradd -g postfix -u 2525 -s /sbin/nologin -M postfix
//-M 不创建用户家目录
#groupadd -g 2526 postdrop
#useradd -g postdrop -u 2526 -s /bin/false -M postdrop
//postdrop服务用于队列管理,投递信件。
3.1.2 拆解postfix数据包
#tar -zxvf postfix-2.6.5.tar.gz
3.1.3 配置,安装
#makemakefiles
'CCARGS=-DHAS_MYSQLCI /usr/include/mysql //指明要和mysql结合
-DUSE_SASL_AUTH-DUSE_CYRUS_SASL CI /usr/include/sasl //知名使用sasl
-DUSE_TLS' 'AUXLIBS=-L/usr/lib/mysql Cl mysqlclient //指明mysql的一些文件
-lz-lm CL /usr/lib/sasl2 -lsasl2 -lssl-lcrypto'
注意:如果使用rpm包安装则不需要指明mysql相关。
#make make install,在make install的过程中,postfix会让用户选择一些路径。
install_root:[/] / //指明所安装的文件的目录,默认是不同文件去不同的目录,比如普通用户的命令放置在/usr/bin目录下
tempdir: [/usr/local/src/ postfix-2.6.5]/tmp //指明一些临时文件的存放目录
config_directory: [/etc/postfix]/etc/postfix //指明配置文件所在的目录
daemon_directory: [/usr/libexec/postfix]
command_directory: [/usr/sbin] //指明管理员使用的命令
queue_directory: [/var/spool/postfix] //指明邮件队列目录
sendmail_path: [/usr/sbin/sendmail] //指明sendmail命令目录
newaliases_path: [/usr/bin/newaliases] //创建用户别名的命令所在目录
mailq_path: [/usr/bin/mailq]
mail_owner: [postfix]
setgid_group: [postdrop] //关于邮件的队列和管理目录
html_directory: [no] /var/www/postfix_html
manpages: [/usr/local/man]
readme_directory: [no]
3.1.4 postfix的控制脚本
1.可以自己编写启动脚本
#!/bin/bash
# postfix PostfixMail Transfer Agent
# description: Postfix is a Mail Transport Agent, which is theprogram
# that movesmail from one machine to another.
# processname: master
# pidfile: /var/spool/postfix/pid/master.pid
# config: /etc/postfix/main.cf
# config: /etc/postfix/master.cf
# Based on startup script from Simon J Mudd<sjmudd@pobox.com>
# 25/02/99: Mostly s/sendmail/postfix/g by John A. Martin<jam@jamux.com>
# 23/11/00: Changes & suggestions by Ajay Ramaswamy<ajayr@bigfoot.com>
# 20/01/01: Changes to fall in line with RedHat 7.0 style
# 23/02/01: Fix a few untidy problems with help from DanielRoesen.
# Source function library.
. /etc/rc.d/init.d/functions
# Source networking configuration.
. /etc/sysconfig/network
[ ${NETWORKING} = "no" ] && exit 0 //先判断是否连接到网络,如果没有邮件发不出去,服务必定起不来
[ -x /usr/sbin/postfix ] || exit 0
[ -d /etc/postfix ] || exit 0
[ -d /var/spool/postfix ] || exit 0
start() {
# Start daemons.
echo -n$"Starting postfix: "
RETVAL=$?
[ $RETVAL -eq 0 ]&& touch /var/lock/subsys/postfix
echo
stop() {
# Stop daemons.
echo -n$"Shutting down postfix: "
/usr/sbin/postfixstop 2>/dev/null 1>&2 && success || failure $"$progstop"
RETVAL=$?
[ $RETVAL -eq 0 ]&& rm -f /var/lock/subsys/postfix
echo
return $RETVAL
}
reload() {
echo -n$"Reloading postfix: "
RETVAL=$?
echo
return $RETVAL
}
abort() {
return $?
}
flush() {
return $?
}
check() {
return $?
}
restart() {
}
# See how we were called.
case "$1" in
start)
start
;;
stop)
stop
;;
restart)
stop
start
;;
reload)
reload
;;
abort)
abort
;;
flush)
flush
;;
check)
check
;;
status)
status master
;;
condrestart)
[ -f/var/lock/subsys/postfix ] && restart || :
;;
*)
echo $"Usage:$0 {start|stop|restart|reload|abort|flush|check|status|condrestart}"
exit 1
esac
exit $?
2. 在光盘的rpm包中的postfix的启动脚本,拷贝出来,即可使用
mkdir/tmp/abc
cp/mnt/cdrom/Server/postfix-2.3.3-2.1.el5_2.i386.rpm /tmp/abc/
rpm2cpiopostfix-2.3.3-2.1.el5_2.i386.rpm | cpio Cid //将rpm拆解出来
cd /tmp/abc/etc/rc.d/init.d
cp-p postfix /etc/init.d/postfix
3.1.5 进行postfix的简单配置,编辑/etc/postfix/main.cf文件
75 myhostname = mail.extmail.com
83 mydomain = extmail.com
98 myorigin = extmail.com
113 inet_interfaces = all
161 mydestination =$myhostname, localhost.$mydomain, localhost, $mydomain
260 mynetworks = 192.168.229.0/24 168.100.189.0/28, 127.0.0.0/8
说明:
myorigin 参数用来指明发件人所在的域名;
mydestination 参数指定postfix接收邮件时收件人的域名,即您的postfix系统要接收到哪个域名的邮件;
myhostname 参数指定运行postfix邮件系统的主机的主机名,默认情况下,其值被设定为本地机器名;
mydomain 参数指定您的域名,默认情况下,postfix将myhostname的第一部分删除而作为mydomain的值;
mynetworks 参数指定你所在的网络的网络地址,postfix系统根据其值来区别用户是远程的还是本地的,如果是本地网络用户则允许其访问;
inet_interfaces 参数指定postfix系统监听的网络接口;
注意:
1、在postfix的配置文件中,参数行和注释行是不能处在同一行中的;
2、任何一个参数的值都不需要加引号,否则,引号将会被当作参数值的一部分来使用;
3、每修改参数及其值后执行 postfix reload 即可令其生效;但若修改了inet_interfaces,则需重新启动postfix;
4、如果一个参数的值有多个,可以将它们放在不同的行中,只需要在其后的每个行前多置一个空格即可;postfix会把第一个字符为空格或tab的文本行视为上一行的延续;
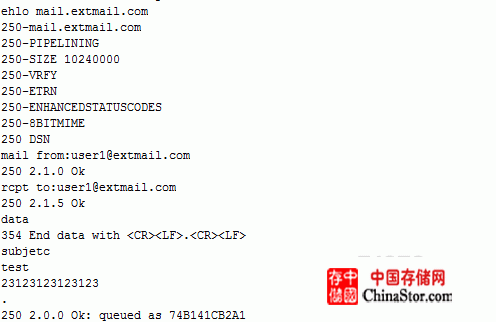
3.1.6 邮件收发测试
新建用户user1,使用telnet连接到本地25端口

3.2 postfix结合sasl实现身份验证
3.2.1 安装sasl相关的软件包
cyrus-sasl-lib-2.1.22-5.el5
cyrus-sasl-2.1.22-5.el5
cyrus-sasl-plain-2.1.22-5.el5
cyrus-sasl-devel-2.1.22-5.el5
3.2.2 产生postfix与sasl相结合的smtp.conf文件
cp -p /usr/lib/sasl2/Sendmail.conf/usr/lib/sasl2/smtpd.conf
3.2.3 重新启动saslauthd 服务

chkconfig saslauthd on
3.2.4 配置postfix的main.cf,添加sasl的身份验证功能
############################CYRUS-SASL############################
broken_sasl_auth_clients= yes
smtpd_recipient_restrictions=permit_mynetworks,permit_sasl_authenticated,rejec
t_invalid_hostname,reject_non_fqdn_hostname,reject_unknown_sender_domain,reject_non_fqdn_sender,reject_non_fqdn_recipient,reject_unknown_recipient_domain,reject_unauth_pipelining,reject_unauth_destination
smtpd_sasl_auth_enable= yes //启动身份验证
smtpd_sasl_local_domain= $myhostname //设置启动sasl的域
smtpd_sasl_security_options= noanonymous //不允许匿名
smtpd_banner= Welcome to our $myhostname ESMTP,Warning: Version not
Available! //用于在telnet命令中 ehlo 显示信息
3.2.5 验证
重启postfix saslauthd服务
设置saslauthd 开机启动chkconfig saslauthd on

3.3 使用courier-authlib实现与mysql结合
3.3.1 拆包
#tar -jxvfcourier-authlib-0.63.1.20111230.tar.bz2 -C /usr/local/src/
3.3.2 配置,编译并安装
#cd /usr/local/src/courier-authlib-0.63.1.20111230
#./configure
--prefix=/usr/local/courier-authlib //指明安装路径
--sysconfdir=/etc //指明配置文件的位置
--with-authmysql //表示要使用mysql实现验证
--with-mysql-libs=/usr/lib/mysql //指明mysql的库文件
--with-mysql-includes=/usr/include/mysql //mysql的头文件
--with-redhat //针对redhat系统优化
--with-authmysqlrc=/etc/authmysqlrc
//authmysqlrc记录验证的时候使用哪个数据库
--with-authdaemonrc=/etc/authdaemonrc
//authdaemonrc记录验证的时候调用哪些模块
--with-ltdl-lib=/usr/lib //不加会报错
--with-ltdl-include=/usr/include //不加或报错
#Make&& make install
3.3.3 处理安装后的头文件和库文件
头文件
#vim /etc/ld.so.conf.d/courier-authlib.conf
添加/usr/local/courier-authlib/lib/courier-authlib/
#Ldconfig
#ldconfig -pv | grep courier-authlib
库文件
#mkdir /usr/include/courier-authlib
#ln -s /usr/local/courier-authlib/include/*/usr/include/courier-authlib/
3.3.4 访问方式
类似于mysql这种服务,使用的是端口访问,直接访问端口就能访问mysql服务,这种叫做端口sock
但是courier-authlib 是没有端口的,他是靠文件sock来访问,访问某个文件就相当于访问了该服务

# chmod 755/usr/local/courier-authlib/var/spool/authdaemon
// courier-authlib运行后sock文件在 authdaemon目录下
# cp /etc/authdaemonrc.dist /etc/authdaemonrc
# cp /etc/authmysqlrc.dist /etc/authmysqlrc
vim /etc/authdaemonrc
27 authmodulelist=" authmysql "
//默认安装了多个模块,删除只留下authmysql
34 authmodulelistorig=" authmysql"
53 daemons=5 //工作时支持的线程数
60authdaemonvar=/usr/local/courier-authlib/var/spool/authdaemon
//服务启动后sock文件放置的位置
#vim /etc/authmysqlrc
26 MYSQL_SERVER localhost
27 MYSQL_USERNAME extmail
28 MYSQL_PASSWORD extmail
49 MYSQL_SOCKET /var/lib/mysql/mysql.sock
//当mysql文件版本低于3.22时,需要指明文件sock位置
56 MYSQL_PORT 3306
68 MYSQL_DATABASE extmail
83 MYSQL_USER_TABLE mailbox
92 MYSQL_CRYPT_PWFIELD passwd
//对口令字段 加密
105 DEFAULT_DOMAIN extmail.com
113 MYSQL_UID_FIELD 2525
//这里默认是‘uid‘,用户通过账号登陆mail服务器,使用的是虚拟账号,虚拟账号必定与本地账号所对应,而这里的本地账号就是最初创建的postfix账号,他的uid是2525
119 MYSQL_GID_FIELD 2525
128 MYSQL_LOGIN_FIELD username
//mailbox表中验证用户时使用的字段是哪个
128 MYSQL_LOGIN_FIELD concat('/var/mailbox/',homedir)
//使用concat函数将 用户家目录和/var/mailbox 绑定
133 MYSQL_HOME_FIELD name
//数据库中的名称字段
150 MYSQL_MAILDIR_FIELD concat('/var/mailbox/',maildir)
3.3.5 控制脚本开机自动启动
#cd /usr/local/src/courier-authlib-0.63.1.20111230
#cp -p courier-authlib.sysvinit /etc/init.d/courier-authlib
#chmod a+x /etc/init.d/courier-authlib
[root@extmailcourier-authlib-0.63.1.20111230]# service courier-authlib start
StartingCourier authentication services: authdaemond 启动成功
#cd/usr/local/courier-authlib/var/spool/authdaemon

chkconfigcourier-authlib on //开机自动启动
3.3.6 创建配置文件中的mailbox目录,用户存放用户。
#mkdir -pv /var/mailbox
#chown -R postfix /var/mailbox
3.3.7 courier-authlib与 cyrus-sasl结合。
#vim /usr/lib/sasl2/smtpd.conf
1 pwcheck_method: authdaemond
2 log_level: 3
3 mech_list:PLAIN LOGIN
4 authdaemond_path:/usr/local/courier-authlib/var/spool/authdaemon/socket
3.4 postfix支持虚拟域和虚拟用户
1、编辑/etc/postfix/main.cf,添加如下内容:
########################VirtualMailboxSettings####################
virtual_mailbox_base= /var/mailbox
virtual_mailbox_maps= mysql:/etc/postfix/mysql_virtual_mailbox_maps.cf
virtual_mailbox_domains= mysql:/etc/postfix/mysql_virtual_domains_maps.cf
virtual_alias_domains=
virtual_alias_maps= mysql:/etc/postfix/mysql_virtual_alias_maps.cf
virtual_uid_maps= static:2525
virtual_gid_maps= static:2525
virtual_transport= virtual
maildrop_destination_recipient_limit= 1
maildrop_destination_concurrency_limit= 1
##########################QUOTASettings#######################
message_size_limit= 14336000
virtual_mailbox_limit= 20971520
virtual_create_maildirsize= yes
virtual_mailbox_extended= yes
virtual_mailbox_limit_maps= mysql:/etc/postfix/mysql_virtual_mailbox_limit_maps.cf
virtual_mailbox_limit_override= yes
virtual_maildir_limit_message= Sorry, the user's maildir has overdrawn his diskspace quota, please Tidy yourmailbox and try again later.
virtual_overquota_bounce= yes
启用虚拟域以后,需要取消中心域,即注释掉myhostname, mydestination, mydomain, myorigin几个指令;当然,你也可以把mydestionation的值改为你自己需要的。
4.Extman---对于虚拟域的配置
4.1 Extman安装配置
4.1.1 拆包
#tar -zxvf extman-1.1.tar.gz -C /usr/local/src/
4.1.2 导入相关信息到数据库中
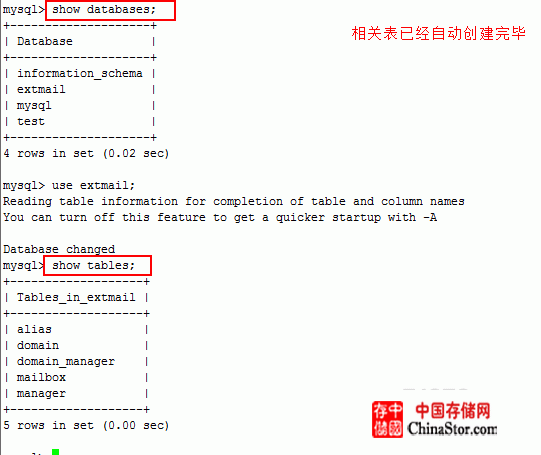
#cd /usr/local/src/extman-1.1/docs
extmail.sql文件提供了所需要在数据库中创建的表信息

4.1.3 赋予用户extmail对数据库的权限
mysql>grant all privileges on extmail.* to extmail@localhost identified by 'extmail';
QueryOK, 0 rows affected (0.00 sec)
mysql>flush privileges;
QueryOK, 0 rows affected (0.00 sec)
4.1.4 让postfix支持虚拟域

5.Dovecot
5.1 安装dovecot-1.0.7-7.el5 服务
5.2 编辑配置文件 /etc/dovecot.conf
211mail_location = maildir:/var/mailbox/%d/%n/Maildir
//maildir 表明目录的类型,/var/mailbox指明邮件的存放地,%d表示所属域,%n表示用户名,Maildir表示用户具体的存放邮件的目录
5.3 编辑dovecot验证
禁用掉795 # passdbpam {
828 #} //由于我们使用mysql数据库进行验证,所以不需要pam验证
869 passdb sql {
870 # Path for SQL configuration file, see doc/dovecot-sql-example.conf
871 args =/etc/dovecot-mysql.conf
872 }
//用于比对用户的密码
930 userdbsql {
931 # Path for SQL configuration file, see doc/dovecot-sql-example.conf
932 args = /etc/dovecot-mysql.conf
933 }
//用于比对用户账号
测试:

此时启动dovecot是可以启动的,但是端口并没有开启。

5.4 编辑dovecot-mysql.conf文件,说明dovecot连接数据库的方法
# vim /etc/dovecot-mysql.conf
driver = mysql
connect = host=localhost dbname=extmail user=extmailpassword=extmail
default_pass_scheme = CRYPT
password_query = SELECT username AS user,password ASpassword FROM mailbox WHERE username ='%u'
user_query = SELECT maildir, uidnumber AS uid,gidnumber AS gid FROM mailbox WHERE username = '%u'
5.5 测试:
重启dovecot服务 并且查看日志

5.6 在postfix中指明接收邮件的家目录
修改/etc/postfix/main.cf
415 home_mailbox = Maildir/ //将注释打开
6.Extmail
6.1 拆包 进入相关目录下
# tar -zxvfextmail-1.2.tar.gz CC /usr/local/src
# cd/usr/local/src/extmail-1.2
6.2 移动extmail目录
# mkdir-pv /var/www/extsuite //创建目录
# mv extmail-1.2 /var/www/extsuite/extmail
# cd /var/www/extsuite/extmail-1.2/
6.3修改cgi目录中的文件
 6.4修改extmail的配置文件
# mv webmail.cf.default webmail.cf
# vim webmail.cf
104 SYS_MESSAGE_SIZE_LIMIT = 5242880 //用户可以发送的最大邮件大小
77 SYS_USER_LANG = zh_CN //语言设为中文
127 SYS_MAILDIR_BASE = /var/mailbox //设置用户邮件的存放目录
139 SYS_MYSQL_USER = extmail
140 SYS_MYSQL_PASS = extmail //连接数据库的用户和密码
142 SYS_MYSQL_HOST = localhost //指明数据库服务器主机名,因为用
户连接到服务器,来与数据库交互,就相当于是在本地了
145 SYS_MYSQL_TABLE = mailbox
146 SYS_MYSQL_ATTR_USERNAME = username
147 SYS_MYSQL_ATTR_DOMAIN = domain
148 SYS_MYSQL_ATTR_PASSWD = password
//用来指定验正用户登录里所用到的表,以及用户名、域名和用户密码分别对应的表中列的名称
197: SYS_AUTHLIB_SOCKET=/usr/local/courier-authlib/var/spool/authdaemon/socket
//用来指明authdaemosocket文件的位置,以实现postfix通过数据库身份验证
7.apache配置
7.1 编辑主配置文件采用虚拟主机来实现登陆
992 <VirtualHost *:80>
993 ServerName mail.test.com
994 DocumentRoot /var/www/extsuite/extmail/html/
995 ScriptAlias /extmail/cgi /var/www/extsuite/extmail/cgi
996 Alias /extmail /var/www/extsuite/extmail/html
997 </VirtualHost>
7.2 # vi /etc/httpd/httpd.conf
231 User postfix
232 Group postfix
//由于extmail要进行本地邮件的投递操作,故必须将运行apache服务器用户的身份修改为邮件投递代理postfix
7.3测试

需要我们打一个补丁
8.Unix-Syslog补丁
#tar -zxvf Unix-Syslog-1.1.tar.gz
#cd Unix-Syslog-1.1

测试:
但是此时用户是没有办法注册的,因为extman还没配置好
9.extman实现用户注册
9.1拆包,并移动
#tar zxvf extman-1.1.tar.gz
#mv extman-1.1 /var/www/extsuite/extman
[root@extmailextman]# mv webman.cf.default webman.cf
9.2修改配置文件
12 SYS_MAILDIR_BASE = /var/mailbox
//设置的用户邮件的存放目录
21 SYS_CAPTCHA_ON = 0
9.3修改cgi目录的属主:
#chown -R postfix.postfix /var/www/extsuite/extman/cgi/
9.4在apache的主配置文件中Extmail的虚拟主机部分,添加:
997 ScriptAlias /extman/cgi /var/www/extsuite/extman/cgi
998 Alias /extman /var/www/extsuite/extman/html
9.5创建其运行时所需的临时目录,并修改其相应的权限:
#mkdir -pv /tmp/extman
#chownpostfix.postfix /tmp/extman
声明: 此文观点不代表本站立场;转载须要保留原文链接;版权疑问请联系我们。


